Monday, December 31, 2012

Welcome Sweet Babies

The year 2012 saw many many babies being born including ours.  :) So recently I made two baby cards, one for a close friend who had a baby boy and one for my cousin who had a baby girl.

Both cards were made with stamps from The Greeting Farm, the Build a Onesie, Boy and Girl version.

The first one is the boy version.  The 'Welcome Sweet Baby' sentiment is from the Ali Edwards, Sweet Baby stamp set.


I stamped the tie on a piece of kraft card stock and coloured it with Copic markers.  The onesie is matted on a romantic rectangle die cut on neenah white card stock.


I stamped another sentiment from the Sweet Baby stamp set inside and I love this sentiment.

The one below is the girl version. I matted the onesie on another Spellbinder die cut called Butterfly Circles.  It doesn't really show up on the photo but I added Star Dust stickles on the outline of the onesie.


I really love how both cards turned out although I've had to steal a little time here and there to make the cards. 

Thanks for visiting my blog and Happy New Year! Many blessings of joy and happiness to all!

Sunday, December 9, 2012

More Thank You Cards

Here are another two 'Thank You' cards I was able to make with my limited supplies.  Seriously having colouring withdrawal symptoms.  My Copic markers have all been packed away in storage and I won't be able to access it for another 4 months!


The above is a super simple card using Labels 23 from Spellbinders and patterned paper from the Simple Stories' Fabulous collection.  The sentiment is from PTI's Over Under Easy stamp set and I really love this set because it comes with all the flourishes that fit with the sentiments separately.  The little punched out heart at the side is actually to cover up a boo boo and I put glossy accents on it.  


The card above is a 4.5" x 4.5" square card and I used the Spellbinders Asian Motifs to cut out Neenah White cardstock and PTI's Aqua Mist card stock.  The sentiment is from Just Rite stamps.

Due to lack of time nowadays, the pictures above were taken with my phone.  Hehe.

Hope you all have a great weekend!

Friday, November 23, 2012

Thank You Card

After many months and not having my full set of supplies with me, I have managed to churn out a simple 'Thank You' card.


The card base is using PTI card stock in the colour Winter Wisteria. Love this colour. I embossed the white card stock with the M-bossibility folder from Spellbinders called Garden Delight.  Love the imprint that the M-bossibilities produce.

I then used PTI's clear stamp set called Heart-to-Heart #3 and stamped the hearts and 'Thank You' in both Winter Wisteria and Plum Pudding ink.  The 'Thank You' is stamped on a cut out using Spellbinders Fancy Tags Number 2 and the flourish underneath is from the Over Under Easy stamp set.

I apologise for the bad picture.  It was taken using my phone and the lighting was bad plus I don't have my photo editing software with me...Grr...

Hope you all have a nice weekend. 

Saturday, November 10, 2012

Thanks be to God


I just wanted to write a short post today about how the Lord works in mysterious ways.  Isabelle always had trouble being bottle fed (either with expressed breast milk or formula milk).  We would only be able to bottle feed her if she was asleep or what we call during a dream feed.  Although I know that breast milk is best for a baby, I was very stressed during the first few months as I did not feel that my supply was sufficient for her needs.  It really got me down because I knew that if I did not produce enough milk for Isabelle, she would have nothing else to drink since she did not take formula milk.

Then suddenly the most miraculous thing happened.  About 2 weeks ago, I felt she had not fed enough from me and I prepared a bottle with expressed breast milk.  I fed it to her myself and she drank every last drop while she was AWAKE (although it was only 2 ounces).  I could not believe it.  After, I tried giving her formula milk just to see if she would take it and she DID.  I was just in shock.  Although she does take formula milk, I still endeavour to provide her with breast milk.  But at least now, I can enjoy being her mother and not stress about my milk supply.

The Lord works in mysterious ways because if she had taken to the bottle or formula milk earlier, I probably would not have persevered in completely breastfeeding her.

Friday, November 2, 2012

Happy 6 Months Old to my beloved Isabelle


Today my beloved Isabelle turns 6 months old.  How time really flies.  It has been a trying but blissfully happy 6 months with this little someone I never thought I'd get to meet.  I look at her everyday and wonder how the Lord chose me to be the mother to this beautiful being.  

I want to thank the Lord for keeping Isabelle in good health except for the cold that she is having right now.  I hope it does not take a turn for the worse but am thankful that she has not had any major illnesses or complications and is in reasonably good health.  She is a very happy child and does not fuss very much (except when I am trying to feed her).  Can you imagine?  She fusses when there IS milk and I am trying to give it to her.  I have only heard of babies who fuss because there is no more milk coming out from their mother's breasts!  Isabelle loves to play and is at the stage where she is most curious about everything new. 


She loves to go out and I feel she knows we are about to go out of the house when she sees me wearing different clothes or carrying her diaper bag.  Her level of understanding really amazes me sometimes.


I am now trying to start planning for her 1st birthday party much to the chagrin of her Papa.  Hehe.  I am hoping to make it an afternoon to remember.  She will have to remember it via photos of course when she gets bigger.  Hopefully I get around to making a scrapbook album for her.

I also want to say that as always I believe all things happen for a reason.  My husband and I are at a point where we've sold our old house and awaiting to move into a new one.  There were some complications getting the keys to our new place and during this time, we have been staying with my parents and I must say, it has been great having my mom to help me out especially during her night feed.  Not sure what I would have done without my mom.  


I have not been able to get any craft done yet but I am still hoping to find time to make some 'Thank You' cards very soon.  Will post them up when and if I have the time.


Thank you all for visiting today.  Have a great weekend ahead!

Sunday, July 1, 2012

My Precious Darling Isabelle

I have not been able to blog since my last post as I delivered my darling baby girl on 2nd May 2012.  She arrived via an emergency C-section because I had originally wanted to have a normal delivery.  However, baby girl decided she was not going to come out the normal way and so we had to have the c-sect to get her out.


Her name is Isabelle Jade Sim and how time has flown by.  She is now approximately two months old. During these two months, it has been an emotional roller coaster, from being deliriously happy, to being upset and to feeling guilty and so forth.  I am thankful though that she seems to be a relatively easy to understand child.  Isabelle does not cry for no reason (or rather not for reasons we do not understand) and I would say is a happy and contented child.  The only time she gets pretty impatient (and you would know that she is impatient with you) is when it is eating time.  

The role of motherhood is not an easy one which I have found out.  Another thing I've realised, I think breastfeeding is harder than the actual labour! I had sore and bleeding nipples pretty much for the first 2-3 weeks and thankfully it is better now.  I only wish that I had an oversupply of breast milk for my little one so that I know for sure that she is always getting enough.  I stress about whether she eats enough and currently, she is under the 50th percentile when it comes to weight gain.  Another point to worry for me.  I've realised that as a parent, there is always something to worry about day after day.  Does she have enough to eat, why is her poop this colour, why is she soooo sleepy, why won't she sleep in her bed and so forth.

For all the difficult times, I truly forget with every smile she gives me.  Isabelle is now able to lift her own neck (started way before she turned two months), sucks on her thumb, coos, laughs and even has conversations with those talking to her.  It is the most amazing thing.  

It took my hubby and I a long time to be blessed with her presence and now that she's here, I couldn't and wouldn't ever want a life without her. Cliche I know, but true.

Till next time......

Friday, April 20, 2012

Altered Wood Photo Frame

This is a project that I just finished and I wanted to put a picture of my parents in it because I realised that there are no pictures of them in their house. They have pictures of their kids and grandkids but not of themselves together so I thought it would be nice to just make them a small altered frame, although probably my mom would appreciate it more seeing that it's so girly. Haha. I really like how it turned out and hope you think so too!

I first painted the wood frame with Jo Sonja acrylic paint in Warm White. Then I spread a layer of Folk Art Crackle Medium over it and let dry. After that, I spread on a layer of Martha Stewart's Multi Surface Acrylic Craft paint in the colour Ballet Slipper. The crackle is there but because I did not use contrasting colours, the effect is subtle. I had initially wanted to paint the top coat a brown colour but changed my mind. I then sprayed Lindy Stamp Gang's Creme Brulee Creme Starburst Spray over the frame to give it a subtle shimmer.

The items I used to embellish this frame is mainly from I Am Roses except for the laser cut chipboard butterfly which is from Dusty Attic.

I embossed this laser chipboard cutout from Dusty Attic using Lindy Stamp Gang's embossing powder in the colour Twilight Slate Bronze. Love the effect. Just added some Kaisercraft pearls to embellish it.


The top flower started off as just gardenia petals which I sprayed with different sprays from Tattered Angels and Lindy Stamp Gang. I love the flower centers which I made from supplies bought off Ebay and Etsy. I learned to make these flower centers from some YouTube gurus. LOVE THEM.... I am also loving the sprays from I Am Roses. Only used one so far from the new stuff I got from them but already wanting more. Haha.

A last look at the frame. I am really pleased at how it turned out. Contemplated adding some aluminium flowers as well but decided not to crowd the frame too much.

Hope you enjoyed the photos and let me know what you think of the frame and if there is anything I can improve on.

Have a great weekend everyone!

Monday, April 16, 2012


This is a card I made for a friend whose pregnancy is just little bit more far along then mine. We couldn't make it to her baby shower so we bought her a gift and I included this card.

Initially I wanted to make this card for MFT's Wednesday Stamp Challenge but it didn't really turn out according to the sketch so I have to give this week's challenge a miss.

The elephant stamp and die cut is from PTI's Sweet Baby stamp and die collection set. I embossed the blue cardstock with a Cuttlebug die and the border on the strip of patterned paper was die cut from an MFT die. The pattern paper is from the Fancy Pants' Baby Mine collection. The brads are from Making Memories. Hmm, I'm also running out of those silver brads, need to get more of those.

Anyhow, this was just a simple card but hope that you all like it. Thanks for visiting my blog and have a great week ahead.

Monday, April 9, 2012

Lawnscaping Challenge #31 - Coloring

This is the card that I am submitting for the coloring challenge over at the Lawnscaping Challenge blog. I would say it is a pretty clean and simple card that can be given to either gender for their birthdays.


The ice cream image is from Lawn Fawn's Admit One stamp set. I stamped it with Memento Tuxedo Black Ink and coloured it in with my Copics. I then applied glossy accents on just the cone part of the image. The sentiment 'happy birthday' is from Lawn Fawn's Sophie's Sentiments stamp set.

The wood grain patterned paper is from Basic Grey's Life of the Party collection. I distressed the edges with my Tim Holtz distressing tool and inked the edges with Antique Linen and Vintage Photo distress ink. I added four glam studs from i-rock to give it a little bit more interest.

For the inside of the card, I used the same wood grain patterned paper and inked the edges with the same distress inks.

Thank you for visiting my blog! Have a nice day ahead!

FFF Challenge - The Greeting Farm


This card is a simple one as the theme on The Greeting Farm's Friday Farm Fresh Challenge this week is "Good Things Come in Small Sizes" and the card is not supposed to be larger than a 4" x 4" card.

I started out wanting to do some different paper layers then realised I did not have much space after putting the image of Blush Babette on the front. So I improvised and cut out some patterned paper from Basic Grey's Hopscotch collection with the MFT's Decorative Doily Die-namics.

I coloured in Blush Babette with my copic markers and stamped the sentiment from the same stamp set. The fabric flowers are also from BG's Hopscotch collection and the studs are Glam Rocks from the i-rock range of products.

For the inside of the card, I decided to leave it quite plain and accentuated with butterfly punch outs from the same patterned paper as used in the front. The card base is from PTI.

Thank you for visiting my blog and hope that everyone will have a great week ahead!

Saturday, April 7, 2012

You're An Inspiration

After a long long hiatus from entering ANY card challenges, I have finally uploaded one today for the the MFT Wednesday Stamp Club 66 challenge. Here is the card sketch that we were to follow :


And here is my take on the card :


I used the stamp set from MFT's Pure Innocence Water Lily. I do not really have any Mother's Day stamp sets but I thought the sentiment "You're an Inspiration" was something that I've wanted to express to her for a long time.

The patterned papers are from Prima's Madeline Collection. The solid cardstock is PTI Aqua Mist cardstock (I really love this colour). The scallop border was cut out using Spellbinders and I coloured in the image with my Copic markers.

This time I also decided to finish the inside of the card with the same colour combination and pattern paper. I added the mulberry hydrangea flower petals which I sprayed with Glimmer Mist in Iridescent Gold. The turquoise coloured studs on the front of the card and on the flower centre are Glam Studs from i-rock. A friend got them for me and I'm totally loving them.

Well, that's all for now. Hope you enjoyed this short post. Have a great weekend!

Wednesday, April 4, 2012

Sizzix Super Scalloped Crescent Tag for a crafty friend

This is a project that i just completed to give to a crafty friend . The tag is cut out using medium weight chipboard using the sizzix die. Prior to die cutting the chipboard, I had glued on two pieces of patterned paper (one on each side) from Tim Holtz paper stash collection. I then inked around the edges with Distress Ink in Vintage Photo and Walnut Stain.


I sprayed both sides of the patterned chipboard with my Tattered Angels Glimmer Mist in Creme de Cocoa to give it a subtle shimmer. I also sprayed the white mulberry flowers with my Starburst Spray from Lindy's Stamp Gang in Creme Brulee Creme. Totally love my Lindy's sprays because the shimmer output is fantastic and they have so many lovely colours. I then inked the biggest rose with some Vintage Photo distress ink just to give it a little bit of a highlight.

The lace at the bottom of the tag was initially white in colour. I used Lindy's Dark Chocolate Truffle Spray and it stained the lace beautifully. Another reason why I like my Lindy's spray so much.


I left the back of the tag very simple and used a flourish stamp from Tim Holtz's Shabby French stamp set to frame my greeting.

I am entering this tag for the 'Use Your Favorite Tool' Challenge over at the Simon Says Stamp Challenge Blog. My favorite tool being my Cuttlebug of course. :)

That's all from me today! Thank you for visiting my blog!

Saturday, March 31, 2012

My Mind's Eye Mini Album

Finally after a long while, I am back with a craft blog post! I have just completed a mini album from My Mind's Eye for my niece. It contains pictures of her from birth until her first birthday. She's two years old now, so let's say this album is way over due. I think this is a bit of a cheat way to do the mini album because the chipboard pages are already covered with patterned paper. The mini album and collection papers are from MME's Tickled Pink collection.

The mini album does not come with the piece of acetate as you see above. I just thought it needed a little something extra and cut up two pieces of acetate for the front and back. Stamped the acetate with a background flower stamp from Hero Arts with Cotton White Opaque Stazon Ink. This is the first time I am using Stazon and I must say although I love the look on acetate, I do not like the effort that is required to clean the stamp! If anyone has any easier solutions, please share them with me!

The mini album consists of 12 sides (including the back) and I must say that after this, I am currently addicted to making more mini albums in spirit. Just have to find the time to do it. :) The flower (bottom right) was cut out from felt with the TH Tattered Florals die.


A simple page with the floral embellishment and sheer image of a doggie from my last Maya Road warehouse haul last year. (Am awaiting my Spring warehouse sale package from MR, can't wait!).


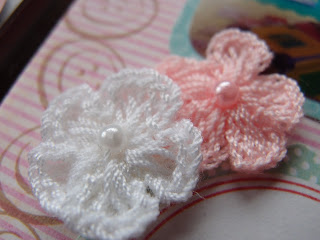
I used stamps from Lawn Fawn's Sew Lovely stamp set on this page and some crochet flowers with pearl centres as embellishments. The crochet flowers are seriously my new favorite!


On this page I cut out the little envelope with a PTI die. I used a Martha Stewart punch for the butterflies and as you can see, more crocheted flowers!


This is a simple page where I just layered borders cut from MFT's scallop border die. I must say that the ledger pattern papers are not my absolute favorite. Maybe because I used to be an accountant? LOL....


I had so many pictures to put on this page that I didn't end up having much embellishments on it except for the white pom pom trims from American Crafts and the felt roses cut out from an MFT Rolled Rose Die. I find that with this die, if I used the full rose pattern cut out, the rose becomes very puffy (or maybe that's just because I don't know how to roll it properly, lol). So what I do is cut of two portions (or two scallops) before I start rolling it into a rose.


These are another of my favorite mulberry flowers to use. Cute and delicate and comes in a variety of colours!


I tied these little bird/duckies with some twine from The Twinery. The birds/duckies were also from my last Maya Road warehouse haul. Love them!


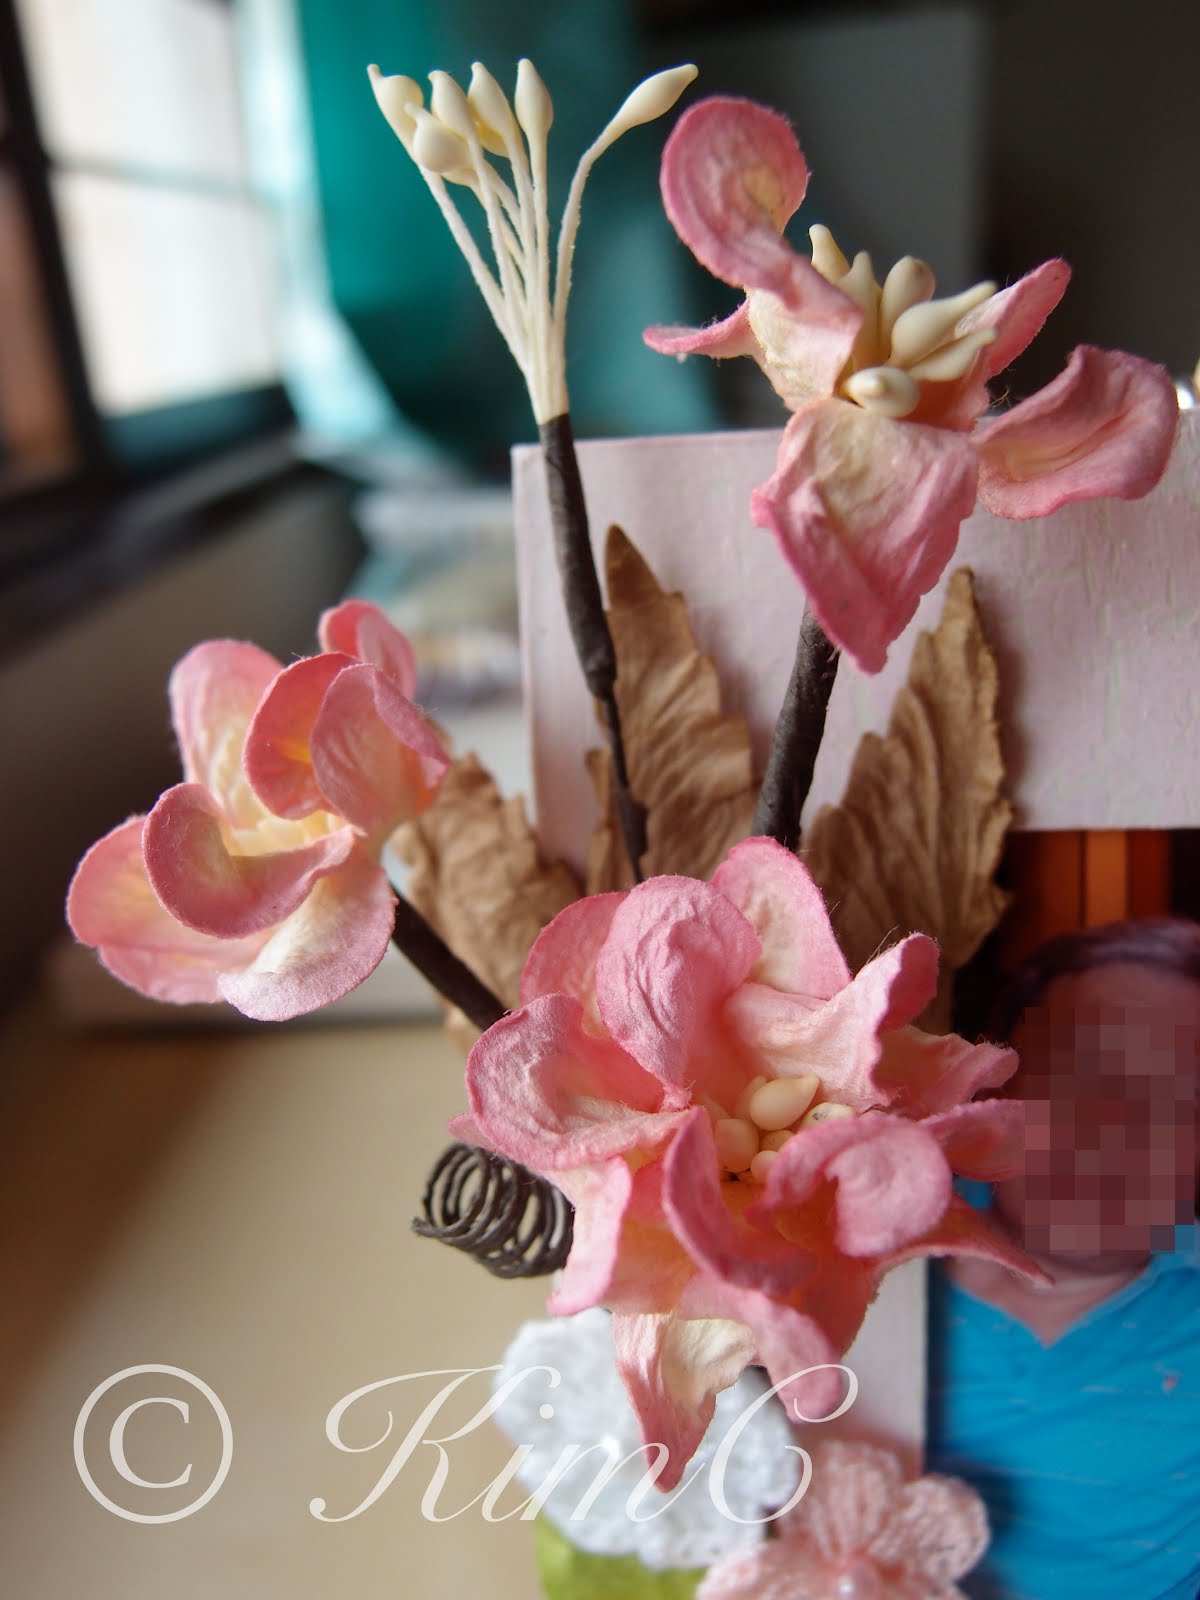
This is the last page of the mini album where I wrote a little note for my niece. I used a variety of flowers to embellish the page. The second picture above was originally a white mulberry hydrangea flower petal which I sprayed with my Starburst Spray from Lindy's Stamp Gang in the colour Cotton Candy Pink. The colour and shimmer payoff from these sprays are simply amazing. I used brads from the same MME collection as the flower centers.

After a long hiatus from using my beloved Copics, I finally found the energy to colour Flutter Anya from The Greeting Farm. I only had to use my Copics on her hair, dress and skin. I used the Magical Micas from Lindy's to colour her wings.

Well, that's all from me today. Hope you all have a great weekend and thank you for visiting my blog!